A cube view can query and submit data into a cube. They are flexible in how they present data, but this section focuses on how to build a simple cube view.
Cube View Properties
Use the following features to manage cube views. In OneStream, go to Application > Presentation > Cube Views to access the Cube Views page. Then, under Cube View Groups, expand a cube view group, and select a cube view to access these properties.
-
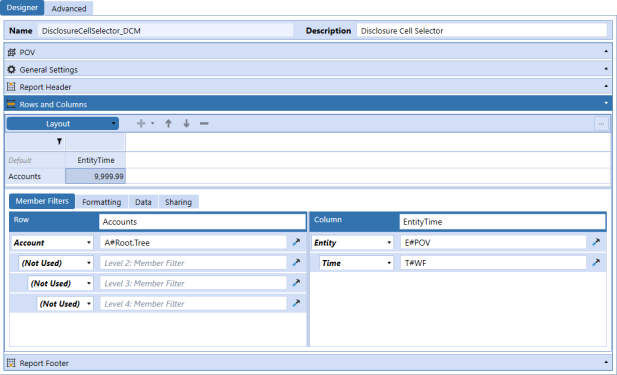
Designer and Advanced: Each tab has the same properties, but they are organized differently. You can use either tab.
-
POV: Make selections for the cube and all dimensions used in the cube view. You do not need to make selections for any dimensions used in rows or columns. Dimensions can also be selected in the Cube POV.
-
General Settings: Apply row and column templates, control common settings, configure headings and formatting, and set navigation links using bound parameters.
-
Report Header: Control what displays in the header when a cube view is run as a data explorer report (PDF style).
-
Rows and Columns: Determine the content for the rows and columns.
-
Member Filters: Select the dimension members, parameters, variables, expansions, expressions, and business rules.
-
Formatting: Set the header and cell formatting for the selected row or column or for the default cell for the entire cube view.
-
Report Footer: Control what displays in the footer when a cube view is run as a data explorer report (PDF style).
Cube View Toolbar
Use the following toolbar items to manage cube views.
 Create Group: Organize cube views.
 Create Profile: Organize cube view groups.
 Manage Profile Members: Assign cube view groups to cube view profiles.
 Create Cube View: Create a new cube view in a cube view group.
 Delete Selected Item: Delete a selected item, such as a cube view or cube view group.
 Rename Selected Item: Rename a selected item.
 Cancel All Changes Since Last Save: Cancel unsaved changes.
 Save: Save changes.
 Copy Selected Cube View: Copy the selected cube view to use it as a template for another cube view.
 Search: Search for cube views.
 Open Data Explorer: Run a cube view and see it in a data explorer report.
 Show Objects That Reference The Selected Item: View other areas where the selected item is used. For example, see where a cube view is being used in an application to know the impact of a change. This icon is available on other pages as well.
 Object Lookup: Find and select an object to copy.
Manage Rows and Columns
Access these additional items on the Advanced tab and the Rows and Columns slider to manage rows and columns.
 Add Row or Column: Add rows or columns to a cube view.
 Move Up: Move rows or columns up.
 Move Down: Move rows or columns down.
 Remove Selected Row or Column: Remove a row or column.
Create Cube View Groups and Profiles
Groups organize the artifacts that users are building. Cube views are organized into cube view groups. A cube view group needs to be created before a cube view, and it can include one or more cube views. Profiles further structure the artifacts and enable them to be used in other places in the application and accessed by users. Cube view groups are organized into cube view profiles that are assigned to different areas of the application, such as a workflow profile. Cube view profiles can include one or more cube view groups.
-
On the Cube Views page, click Create Group.
-
Type a name for the new group.
-
Click Save.
-
Click Create Profile.
-
Type a name for the new profile.
TIP: Use the Visibility drop-down menu to specify where cube views can be viewed in the application. The default is Always, which displays the cube views in all listed locations. If you select a specific location, the cube views will display in that location. If you select Never, the cube views will only display in the Cube Views page in the Application tab.
-
Click Save.
Cube View Group Properties
Cube view group properties apply to general and security settings.
General (Cube View Group)
Name
The name of the cube view group.
Description
A short description of how the group is used, or what it contains.
Workspace
The currently selected workspace.
Maintenance Unit
The currently selected maintenance unit.
Security
Access
Members of this group can access the cube views in the cube biew group.
Maintenance
Members of this group have the authority to maintain the cube views in the cube view group.
NOTE: Click  and begin typing the name of the security group in the blank field. As the first few letters are typed, the groups are filtered making it easier to find and select the desired group. Once the group is selected, click CTRL and double-click. This will enter the correct name into the appropriate field.
Assign Cube View Groups to Cube View Profiles
Assign cube view groups to cube view profiles to control how the cube views in the group are accessed, using the visibility cube view profile property.
-
On the Cube Views page, under Cube View Profiles, select a profile.
-
Click Manage Profile Members.
-
Under Available Groups, select the group and then click the arrow to move it to the right.
-
Click OK.
NOTE: You can assign a cube view group to multiple cube view profiles.
Create a New Cube View
-
On the Cube Views page, under Cube View Groups, select a group.
-
Click Create Cube View.
-
Type a name and description for the cube view.
-
Click Save and specify General Settings.
Copy a Cube View
For efficiency, you can copy a cube view to use its formatting settings rather than creating a new cube view. A copy of a cube view is not linked to another cube view.
-
On the Cube Views page, under Cube View Groups, select a cube view.
-
Click Copy Selected Cube View.
-
Select the cube view group from the drop-down menu.
-
Enter a unique name, not used by another cube view, and click OK.
Set the Cube View POV
Every cube view needs a POV setting to retrieve data. To query data in a cube view, set your Cube View POV, rows, and columns. The Cube View POV will set the cube and all of the dimensions used to query the various cells of the cube views.
-
On the Cube Views page, under Cube View Groups, select a cube view.
-
Select the POV slider. Enter the information individually by typing in the fields or clicking the ellipsis for each member, or move the entire Cube POV.
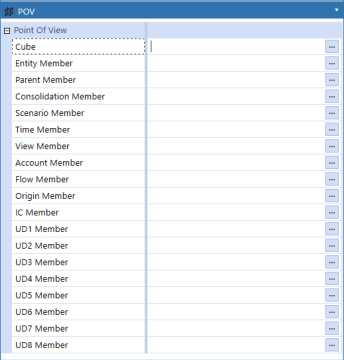
To move the entire Cube POV, on the POV Pane:
-
Right-click Cube POV.
-
Click Copy Cube POV.
-
Right-click the light blue Point Of View header.
-
Click Paste POV.
TIP: To move an entire cube POV, you can also drag and drop the Cube POV from the POV pane into the Cube View POV.
NOTE: The information in the POV slider takes priority over the information in the POV pane.
-
Create Cube View Rows and Columns
-
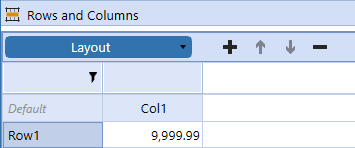
To set the cube view rows and columns, select the Rows and Columns slider. The preview grid for the new cube view displays default row and column names: Row1 and Col1. You can edit these names to make them more descriptive.
-
Click + to add rows or columns, and click - to remove rows or columns.
-
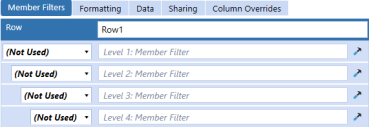
Select a row, column, or intersection in the preview grid, and then set the display options by using the settings tabs. The member filters, formatting, data suppression options, and overrides can be applied at the row and column level.
-
Click Save.
NOTE: See Member Filter Builder.
Create a Cube View Using Shared Rows and Columns
An administrator can share all rows and columns or selected rows and columns from another cube view. Sharing is more efficient when building and managing cube views.
-
On the Cube Views page, under Cube View Groups, select a cube view.
-
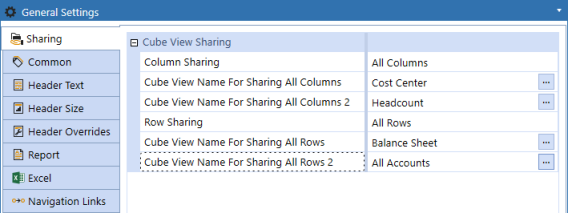
Go to General Settings > Sharing.
-
In the rows for the Row Sharing and Column Sharing, click in the fields to the right to access the drop-down menus. Select the option to share all or specified rows or columns.
-
All Rows/Columns: Enter the source cube view name of the rows and columns to be shared.
-
Specified Rows/Columns: Reference a single row or column from the source cube view when designing rows and columns.
TIP: You can share rows and columns from two cube views. If you share rows or columns with another cube view, updates are automatically linked. This can make building a cube view more efficient.
-
-
If you selected the option to share all rows or columns, click the ellipsis and then select the cube view. Click OK to confirm.
-
Click Save.
Use a Cube View Template
Creating and using cube views as templates can increase efficiency and consistency for cube views that have similar formatting and properties for the rows and columns. If you plan to use templates, create a cube view group specifically for this purpose. For example, create a cube view group with the name template (Templates_Columns or Templates_Rows) and save cube views to use as templates in this cube view group. Then, other users can find and use the templates.
-
On the Cube Views page, under Cube View Groups, select a cube view to use as a template.
-
Click Copy Selected Cube View.
-
Select the cube view group from the drop-down menu and type a name for the new cube view.
-
Click OK.
NOTE: Each cube view must have a unique name.


